
Webpack Configuration in Vue CLI 3
In Vue CLI 3, the way you configure webpack has changed significantly. Unlike Vue CLI 2, a webpack config file isn’t even created unless you set one up yourself. Still, for this or that reason, there are times when you need to tweak the webpack configuration.
There are two ways to configure it.
- Configure it in vue ui
- Edit vue.config.js directly
vue.config.js is created in the project’s root path. Even if you configure things in vue ui, it ends up modifying vue.config.js anyway, so there’s no difference in the result. The explanations below are usage examples of the two methods.
1. Setting the build output path
To configure the dist folder, you just change the setting shown below in vue ui. The content of the Output directory field that the arrow points to is the changed dist folder path.
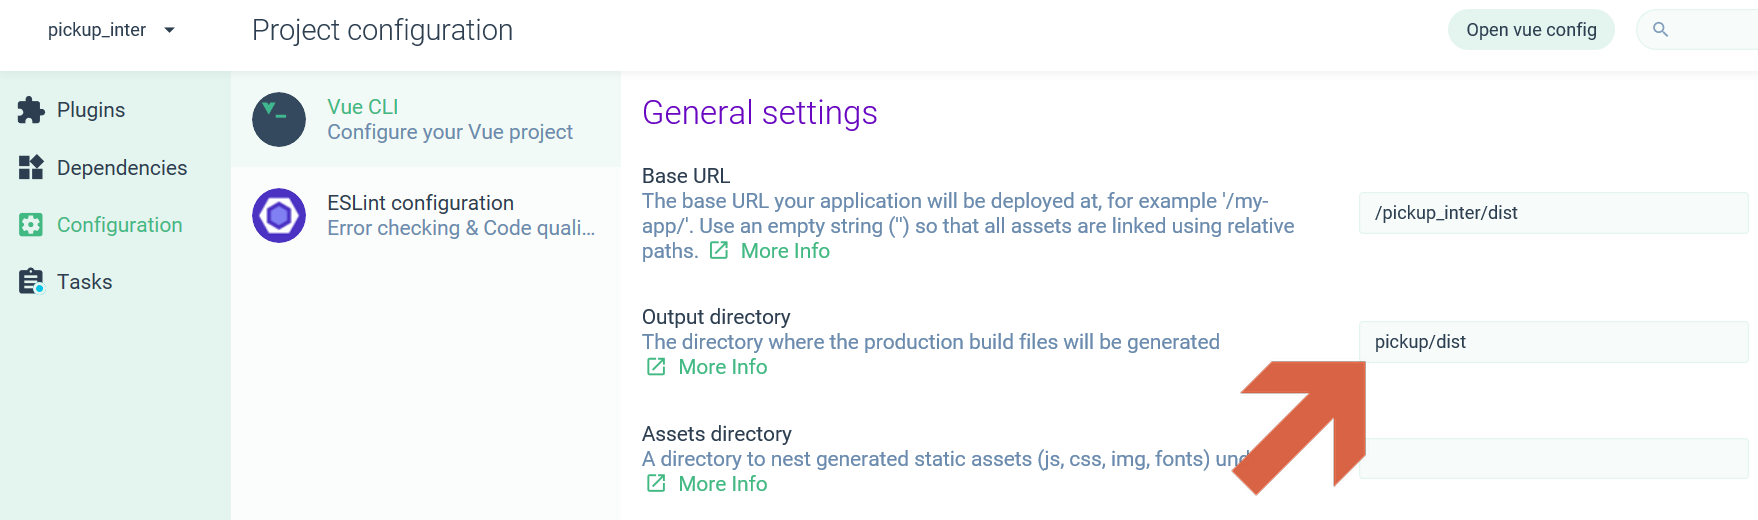
If you set the Output directory as shown above, a new pickup/dist folder is created in the root path of that vue-cli project, and the build output is generated under it.
When you change and save the settings in vue ui, the changes are reflected in vue.config.js. If vue.config.js doesn’t exist yet, a new file is created with the changes applied.
Reference: https://cli.vuejs.org/config/#outputdir
2. Setting the URL
When you convert only part of the entire service to Vue, you need to set the URL separately as the service’s entry point. Otherwise, the index.html generated by the build won’t be able to load the js and css. It would be looking for the js and css in the project’s root path of all places, so of course it wouldn’t work… In Vue CLI 2, the locations of the js and css were set as relative paths from index.html by default, so you didn’t have to configure it separately (I think?), but in Vue CLI 3, you do have to configure it.
To configure it, edit the Base URL setting on the screen from item 1. There are two ways to do this.
1. Leave it blank
The default value of the Base URL setting is /. Delete this and leave the input field blank. This is supposed to make the js and css loaded by index.html be specified as relative paths, but as of Vue-CLI v3.0.0-rc.5, what you’ll actually see is the html, js, and css all created together inside the build output path mentioned above (usually it’ll be dist), with no subdirectory separation. It doesn’t look pretty, but it works regardless.
2. Specify the URL explicitly
If you explicitly specify the URL that index.html will reference for js and css, the build output comes out nicely and you’ll feel at ease. In the Configuration of vue ui, enter the path in the Base URL field. In the capture above, I entered /pickup_inter/dist. This means that the js and css referenced by index.html are located under URL_of_the_service_built_with_Vue/pickup_inter/dist.
Reference: https://cli.vuejs.org/config/#baseurl
3. Application
Make use of git submodule. Specify an explicit URL, then copy the build output into that location and it works fine. This way, you no longer need to needlessly append dist to the URL. And since you use a submodule, it’s easy to manage too.
Reference: https://git-scm.com/book/ko/v2/Git-도구-서브모듈
3. Setting proxyTable
If the frontend and backend servers aren’t separated in your local development environment, you need to configure proxy middleware as shown here.
You just edit the vue.config.js file as shown below. Change the path hardcoded as pickup_inter/api as appropriate.
'use strict'

module.exports = {
  devServer: {
    proxy: { // proxyTable configuration
      '/pickup_inter/api': {
        target: 'https://backend-server-URI/pickup_inter/api',
        publicPath: {
          '^/pickup_inter/api': ''
        }
      }
    }
  }
}
Reference: https://cli.vuejs.org/config/#devserver-proxy
The end!

Leave a comment